Thursday, March 19, 2015

CAMERA LENS FILTERS


Camera lens filters still have many uses in digital photography, and should be an important part of any photographer's camera bag. These can include polarizing filters to reduce glare and improve saturation, or simple UV/haze filters to provide extra protection for the front of your lens. This tutorial aims to familiarize one with these and other filter options that cannot be reproduced using digital editing techniques. Common problems/disadvantages and filter sizes are discussed towards the end.

OVERVIEW: LENS FILTER TYPES

The most commonly used filters for digital photography include polarizing (linear/circular), UV/haze, neutral density, graduated neutral density and warming/cooling or color filters. Example uses for each are listed below:
Filter Type Primary Use Common Subject Matter
Linear & Circular
Polarizers
Reduce Glare
Improve Saturation
Sky / Water / Foliage
in Landscape Photography
Neutral Density (ND) Extend Exposure Time Waterfalls, Rivers
under bright light
Graduated Neutral
Density (GND)
Control Strong Light Gradients
Reduce Vignetting
Dramatically Lit Landscapes
UV / Haze Improve Clarity with Film
Provide Lens Protection
Any
Warming / Cooling Change White Balance Landscapes, Underwater,
Special Lighting

Example of a Polarizing Filter Producing an Uneven SkyLINEAR & CIRCULAR POLARIZING FILTERS

Polarizing filters (aka "polarizers") are perhaps the most important of any filter for landscape photography. They work by reducing the amount of reflected light that passes to your camera's sensor. Similar to polarizing sunglasses, polarizers will make skies appear deeper blue, will reduce glare and reflections off of water and other surfaces, and will reduce the contrast between land and sky.
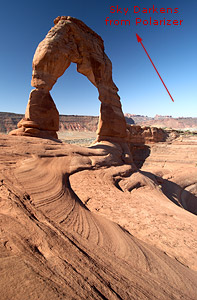
Two separate handheld photos taken seconds apart
Note how the sky becomes a much darker blue, and how the foliage/rocks acquire slightly more color saturation. The intensity of the polarizing effect can be varied by slowly rotating your polarizing filter, although no more than 180� of rotation is needed, since beyond this the possible intensities repeat. Use your camera's viewfinder (or rear LCD screen) to view the effect as you rotate the polarizing filter.
The polarizing effect may also increase or decrease substantially depending on the direction your camera is pointed and the position of the sun in the sky. The effect is strongest when your camera is aimed in a direction which is perpendicular to the direction of the sun's incoming light. This means that if the sun is directly overhead, the polarizing effect will be greatest near the horizon in all directions.
However, polarizing filters should be used with caution because they may adversely affect the photo. Polarizers dramatically reduce the amount of light reaching the camera's sensor — often by 2-3 f-stops (1/4 to 1/8 the amount of light). This means that the risk of a blurred handheld image goes up dramatically, and may make some action shots prohibitive.
Additionally, using a polarizer on a wide angle lens can produce an uneven or unrealistic looking sky which visibly darkens. In the example to the left, the sky could be considered unusually uneven and too dark at the top.
Linear vs. Circular Polarizing Filters: The circular polarizing variety is designed so that the camera's metering and autofocus systems can still function. Linear polarizers are much less expensive, but cannot be used with cameras that have through-the-lens (TTL) metering and autofocus — meaning nearly all digital SLR cameras. One could of course forego metering and autofocus, but that is rarely desirable.

NEUTRAL DENSITY FILTERS

Neutral density (ND) filters uniformly reduce the amount of light reaching the camera's sensor. This is useful when a sufficiently long exposure time is not otherwise attainable within a given range of possible apertures (at the lowest ISO setting).
Situations where ND filters are particularly useful include:
  • Smoothing water movement in waterfalls, rivers, oceans, etc.
  • Achieving a shallower depth of field in very bright light
  • Reducing diffraction (which reduces sharpness) by enabling a larger aperture
  • Making moving objects less apparent or not visible (such as people or cars)
  • Introducing blur to convey motion with moving subjects
example photo using a neutral density filter to smooth water
photo with a smoothed water effect from a long exposure
However, only use ND filters when absolutely necessary because they effectively discard light — which could otherwise be used to enable a shorter shutter speed (to freeze action), a smaller aperture (for depth of field) or a lower ISO setting (to reduce image noise). Additionally, some ND filters can add a very slight color cast to the image.
Understanding how much light a given ND filter blocks can sometimes be difficult since manufacturers list this in many different forms:
Amount of Light Reduction Hoya, B+W and Cokin Lee, Tiffen Leica
f-stops Fraction
1 1/2 ND2, ND2X 0.3 ND 1X
2 1/4 ND4, ND4X 0.6 ND 4X
3 1/8 ND8, ND8X 0.9 ND 8X
4 1/16 ND16, ND16X 1.2 ND 16X
5 1/32 ND32, ND32X 1.5 ND 32X
6 1/64 ND64, ND64X 1.8 ND 64X
Generally no more than a few f-stops is need for most waterfall scenarios, so most photographers just keep one or two different ND filter amounts on hand. Extreme light reduction can enable very long exposures even during broad daylight.

GRADUATED NEUTRAL DENSITY FILTERS

Graduated neutral density (GND) filters restrict the amount of light across an image in a smooth geometric pattern. These are sometimes also called "split filters." Scenes which are ideally suited for GND filters are those with simple lighting geometries, such as the linear blend from dark to light encountered commonly in landscape photography (below).
graduated neutral density filter diagram
GND Filter Final Result
Prior to digital cameras, GND filters were absolutely essential for capturing dramatically-lit landscapes. With digital cameras one can instead often take two separate exposures and blend these using a linear gradient in photoshop. On the other hand, this technique is not possible for fast moving subject matter or changing light (unless it is a single exposure developed twice from the RAW file format, but this increases image noise). Many also prefer using a GND to see how the final image will look immediately through the viewfinder or rear LCD.
GND filters come in many varieties. The first important setting is how quickly the filter blends from light to dark, which is usually termed "soft edge" or "hard edge" for gradual and more abrupt blends, respectively. These are chosen based on how quickly the light changes across the scene, where a sharp division between dark land and bright sky would necessitate a harder edge GND filter, for example. Alternatively, the blend can instead be radial to either add or remove light fall-off at the lens's edges (vignetting).
GND filter with a soft edgeSoft Edge GND
GND filter with a hard edgeHard Edge GND
Radial blend GND filterRadial Blend
note: in the above diagrams white = clear, which passes 100% of the light
Placing the blend should be performed very carefully and usually requires a tripod. The soft edge is generally more flexible and forgiving of misplacement. On the other hand, a soft edge may produce excessive darkening or brightening near where the blend occurs if the scene's light transitions faster than the filter. One should also be aware that vertical objects extending across the blend may appear unrealistically dark
Choose: Final Photo Location of GND Blend
Unrealistic darkening from a GND filter
Note how the rock columns become nearly black at their top compared to below the blend;
this effect is often unavoidable when using GND filters.
A problem with the soft and hard edge terminology is that it is not standardized from one brand to another. One company's "soft edge" can sometimes be nearly as abrupt a blend as another company's so called "hard edge". It is therefore best to take these on a case by case basis and actually look at the filter itself to judge the blend type. Most manufacturers will show an example of the blend on their own websites.
The second important setting is the differential between how much light is let in at one side of the blend versus the other (the top versus bottom in the examples directly above). This differential is expressed using the same terminology as used for ND filters in the previous section. A "0.6 ND grad" therefore refers to a graduated neutral density filter which lets in 2 f-stops less light (1/4th) at one side of the blend versus the other. Similarly, a 0.9 ND grad lets in 3 f-stops less light (1/8th) at one side. Most landscape photos need no more than a 1-3 f-stop blend.

HAZE & UV FILTERS

Nowadays UV filters are primarily used to protect the front element of a camera lens since they are clear and do not noticably affect the image. With film cameras, UV filters reduce haze and improve contrast by minimizing the amount of ultraviolet (UV) light that reaches the film. The problem with UV light is that it is not visible to the human eye, but is often uniformly distributed on a hazy day; UV therefore adversely affects the camera's exposure by reducing contrast. Fortunately, digital camera sensors are nowhere near as sensitive to UV light as film, therefore UV filtration is no longer necessary.
photo of a 77 mm UV filter on a lens
77�mm UV filter
However, UV filters have the potential to decrease image quality by increasing lens flare, adding a slight color tint or reducing contrast. Multicoated UV filters can dramatically reduce the chance of flare, and keeping your filter very clean minimizes any reduction in image quality (although even invisible micro abrasions will affect sharpness/contrast). High quality UV filters will not introduce any visible color cast.
For digital cameras, it is often debated whether the advantage of a UV filter (protection) outweighs the potential reduction in image quality. For very expensive SLR lenses, the increased protection is often the determining factor, since it is much easier to replace a filter than to replace or repair a lens. However, for less expensive SLR lenses or compact digital cameras protection is much less of a factor — the choice therefore becomes more a matter of personal preference.
Another consideration is that UV filters may increase the resale value of the lens by keeping the front lens element in mint condition. In that sense, a UV filter could also even be deemed to increase image quality (relative to an unfiltered lens) since it can be routinely replaced whenever it is perceived to adversely affect the image.

COOL & WARM FILTERS

Cooling or warming filters change the white balance of light reaching the camera's sensor. This can be used to either correct an unrealistic color cast, or to instead add one, such as adding warmth to a cloudy day to make it appear more like during sunset.
Above image's orange color cast is from the monochromatic sodium streetlamps;
with this type of light source virtually no amount of white balance correction can restor full color.
A cooling filter or special streetlight filter could be used to restore color based on other light sources.
These filters have become much less important with digital cameras since most automatically adjust for white balance, and this can be adjusted afterwards when taking photos with the RAW file format. On the other hand, some situations may still necessitate color filters, such as situations with unusual lighting (above example) or underwater photography. This is because there may be such an overwhelming amount of monochromatic light that no amount of white balance can restore full color—or at least not without introducing huge amounts of image noise in some color channels.

PROBLEMS WITH LENS FILTERS

vignetting caused by stacking filers
visible filter vignetting

Filters should only be used when necessary because they can also adversely affect the image. Since they effectively introduce an additional piece of glass between your camera's sensor and the subject, they have the potential to reduce image quality. This usually comes in the form of either a slight color tint, a reduction in local or overall image contrast, or ghosting and increased lens flare caused by light inadvertently reflecting off the inside of the filter.
Filters may also introduce physical vignetting (light fall-off or blackening at the edges of the image) if their opaque edge gets in the way of light entering the lens (right example). This was created by stacking a polarizing filter on top of a UV filter while also using a wide angle lens — causing the edges of the outermost filter to get in the way of the image. Stacking filters therefore has the potential to make all of the above problems much worse.

NOTES ON CHOOSING A FILTER SIZE FOR A CAMERA LENS

Lens filters generally come in two varieties: screw-on and front filters. Front filters are more flexible because they can be used on virtually any lens diameter, however these may also be more cumbersome to use since they may need to be held in front of the lens. On the other hand, filter holder kits are available that can improve this process. Screw-on filters can provide an air-tight seal when needed for protection, and cannot accidentally move relative to the lens during composure. The main disadvantage is that a given screw-on filter will only work with a specific lens size.
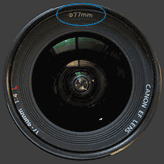
77 mm filter diameterThe size of a screw-on filter is expressed in terms of its diameter, which corresponds to the diameter usually listed on the top or front of your camera lens. This diameter is listed in millimeters and usually ranges from about 46 to 82�mm for digital SLR cameras. Step-up or step-down adapters can enable a given filter size to be used on a lens with a smaller or larger diameter, respectively. However, step-down filter adapters may introduce substantial vignetting (since the filter may block light at the edges of the lens), whereas step-up adapters mean that your filter is much larger (and potentially more cumbersome) than is required.
The height of the filter edges may also be important. Ultra-thin and other special filters are designed so that they can be used on wide angle lenses without vignetting. On the other hand, these may also be much more expensive and often do not have threads on the outside to accept another filter (or sometimes even the lens cap).

Wednesday, March 18, 2015

10 most common mistakes amateur photographers make… and how to avoid them

The joy of digital photography is that it’s a lot cheaper to learn from your mistakes. With no film costs to worry about, you can instantly gauge the success of your technique and settings, and easily delete howlers.
The important thing is to learn from your mistakes, though, not just repeat them; and, of course, you can only work on common mistakes if you know they are mistakes in the first place…
10 most common mistakes amateur photographers make... and how to avoid them: 01. Only using the kit lens

1. Only using the kit lens

While it’s only natural to buy an SLR or CSC with a supplied ‘kit’ lens, it’s only there to get you started. Retailers usually ship quite basic, generalist lenses with starter SLRs, with relatively narrow constant apertures – something like an 18-55mm f/3.5.
These lenses are fine, but built down to a price, so be prepared to invest in more expensive specialist lenses depending on your favourite genres. A prime, wide-aperture lens for portraits (eg 50mm f/1.8), a wide-angle lens for landscapes, and a general-purpose zoom with a wide aperture, such as a 70-200mm f/2.8, for example. Few lenses can ‘do it all.’
10 most common mistakes amateur photographers make... and how to avoid them: 02. Not using Manual enough

2. Not using Manual enough

Once you’ve got to grips with Program, Aperture Priority and Shutter Priority (Tv) shooting modes, it’s important to experiment with Manual. Having to set aperture and shutter speed independently of each other is good practice, and lots of under-or-overexposed shots will teach you a lot about what combinations work, when don’t, want to use Manual, and when to avoid it.
Keep your photos organised and safe with irista

3. Using Manual too much

M doesn’t stand for Macho, however, and don’t use it for the sake of it. Nobody will forgive a poorly exposed image just because you were brave and used Manual. Manual is best used in fairly consistent and predictable light, or in conditions were the semi-automatic modes (P, A, S/Tv) would struggle, such as at a live indoor performance with constantly changing artificial lights.
10 most common mistakes amateur photographers make... and how to avoid them: 04. Not using the Exposure compensation button enough

4. Not using the Exposure Compensation button enough

The Exposure Compensation (+/-) button is incredibly useful when you are out on a shoot, but it’s surprising how many photographers forget it’s there. It’s a fast way to make your picture lighter or darker, and thereby compensate for tricky lighting conditions.
The classic example is increasing the compensation to stop your camera rendering white snow as a dull grey, but you can also ‘compensate’ to lift the exposure on faces outdoors, for instance, or add negative values to create silhouettes.
10 most common mistakes amateur photographers make... and how to avoid them: 05. Not taking control of autofocus points

5. Not taking control of Autofocus points

Autofocus (AF) causes a lot of confusion. A rookie error is to assume it just ‘works’ and that all you need to do is half press the shutter button for perfect focus to be achieved. While the default, ‘auto everything’ AF option can work fine, there are times it gets confused.
It’s often wiser to turn off all the highlighted AF points you see through the viewfinder and just select a single one, moving it to the area you absolutely need to be in focus – the eyes in a portrait for example.
It can take a while to get used to, but the results are well worth it and this is often an effective cure for consistently ‘soft’ portraits. Try changing to single AF with your camera and moving the points around.
10 most common mistakes amateur photographers make... and how to avoid them: 06. Not using AI Servo / Continuous AF

6. Not using AI Servo/Continuous AF

Related to the above, it’s important to remember that there are also different AF ‘modes’ on most higher-end cameras. When you are trying to photograph a moving object, it’s important to move to Continuous/AI Servo AF mode so your camera is tracking said object. With a walking or running person, again, try to keep the AF point over their eyes or face.
10 most common mistakes amateur photographers make... and how to avoid them: 07. Using too narrow apertures

7. Using too narrow apertures

While it’s true that in theory, the narrower the lens aperture the greater the depth of field (front to back sharpness in an image) don’t fall into the trap of closing the aperture right down, as far as it will go, every time.
Rather than nice sharp results you could actually get softer softs, thanks to a frustrating optical phenomenon called diffraction. Better to be more cautious with narrow apertures, using a tripod and cable release and accurate focussing (manual if necessary) for sharp results.
10 most common mistakes amateur photographers make... and how to avoid them: 08. Using too wide apertures

8. Using too wide apertures

At the other extreme, don’t automatically bust your lens aperture open to f/1.4 every time if your lens supports it. Sure, you will have light flooding on to your sensor and facilitate blurred backgrounds, but sharpness may quickly fall away from the immediate area of focus.
The tell tale sign is excessively soft ears on a portrait. Wedding photographers, though, often like the dreamy look you get ‘wide open,’ so it’s all about your intention.
10 reasons your photographs are soft: 08. Not using a tripod

9. Not using a tripod enough

Tripods can be a pain to lug around but they still have their uses. Many top photographers, including National Geographic shooter Ken Kaminseky, reckon that using a tripod more is one of the single best things you can do for your photography. As well as the obvious benefits of greater stability when shooting landscapes, portraits or nature shots, tripods slow you down and get you thinking about composition more.
10 most common mistakes amateur photographers make... and how to avoid them: 10. On-camera flash

10. On-camera flash

Your camera’s built-in flash is handy for adding a pop of light to lift shadows on very sunny days (fill in flash) but otherwise quite limited. Using a separate flashgun is better, but don’t just point it at your subject and blast away, as you still get that amateurish snapshot look – very bright foreground, dark background.
Angle your flashgun towards a white or pale wall or ceiling for nicer results. Also, remember that there is no point using a plastic flashgun diffuser outdoors. If you are serious about flash/strobist effects, get to grips with off-camera flash.

Monday, March 16, 2015

How to Charge the Battery of a Sony Cyber-shot Camera

The Sony Cyber-shot series of pocket-sized digital cameras make shooting high-quality business pictures a breeze. Whether you need to maintain a photo inventory or simply take pictures at your next company picnic, the Cyber-shot's small size and automated settings make taking photos an effortless endeavor. However, even the best camera is useless with a fully discharged battery, so to keep snapping photos, you'll eventually need to charge the battery. Depending on the model of Cyber-shot, this is performed in the camera itself or through a supplied battery charger.

Camera brand...How to choose

This is probably one of the most asked are asked when you want to buy a camera, beside the price of course. What should I buy? What kind of camera should I buy? What camera brand that I should choose?

Type of camera. If you ask me what is the best camera brand, your answer just as good as mine. Not just me, most photographer will give you the same answer. There no such a thing are the best camera brand. It's just depend on you to decide. Rather than asking what is the best brand of camera, you probably should ask what brand of camera would be best for me???

Here is the most popular brand of camera. doesn't mean other than are bad. I just said this is more popular than others.


 http://images4.fanpop.com/image/photos/24100000/Canon-logo-canon-digital-slr-24104073-2560-527.png


http://www.omicrono.com/wp-content/uploads/2012/06/Nikon-logo.jpg

http://www.geeksandbeats.com/wp-content/uploads/2015/01/sony-logo.jpg

 http://life-zelda.eu/en/intranet2/administrative/communication/logos/logo-fujifilm

http://www.logoeps.net/wp-content/uploads/2012/05/pentax-logo.jpg

http://touchpoint-management.com/wp-content/uploads/2012/03/Leica-Logo-RGB.jpg
http://www.sra.samsung.com/assets/Uploads/Samsung-Logo-Wordmark-RGB.png

 https://consumeraffairs.global.ssl.fastly.net/files/logos/olympus_logo_1042.jpg
http://mms.businesswire.com/media/20150217005416/en/410726/5/Panasonic_logo_bl_posi_JPEG.jpg


There are many camera brand. I personally think the most popular camera are Canon and Nikon.

Camera! How!

People taking picture everyday. Maybe thousand of hundred picture are spread online in internet. But most people don't really understand how camera actually work.

Principle of camera can be analogy as a eye. We see thing everyday. Just like camera most people also don't understand how eye see thing. Even I don't really know how. The main thing is that eye capture light and lens control how much light get into the eye, and information from the eyes transfer into the brain.


http://www.daviddarling.info/images/how_the_eye_works.jpg

Alright, lets just leave the eye and back to camera. Camera working on this principle. Unlike with organic part, camera started with a simple box. Around 400BC to 300BC, ancient philosophers of more scientifically advanced cultures (such as China and Greece) were some of the first peoples to experiment with the camera obscura design for creating images. The idea is simple enough—set up a sufficiently dark room with only a tiny bit of light entering through a pinhole opposite a flat plane. The light travels in straight lines (this experiment was used to prove this), crosses at the pinhole, and create an image on the flat plane on the other side. The result is an upside-down version of the objects being beamed in from the opposite side of the pinhole—an incredible miracle, and an amazing scientific discovery for people that lived more than a millennium before the “middle ages.”


Camera_obscura_1

From this camera obscura design, the art of capturing "moment" now even grower than before. To understand modern cameras, we can start with the camera obscura, leap forward a few thousand years, and begin talking about the first pinhole cameras. These use this same simple “pinprick” of light concept, and create an image on a plane of photosensitive material—an emulsified surface that reacts chemically when struck by light. Therefore the basic idea of any camera is to gather light, and record it on some kind of photosensitive object—film, in the case of older cameras, and photo sensors, in the case of digital ones.

 1000px-Pinhole_camera-en.svg


Now camera has become digital and work more conventionally than thousand of years ago. With a touch of a button, you can take a picture of everything. Now everyone can be a photographer even if they don't realize it.